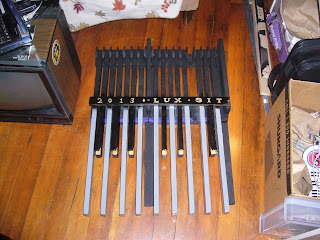
First, the four vertical supports, which connect the guide rails to the pivot rails. Overall, my design aesthetic here is basically to winnow everything down to the "mathematical theorem", the least amount of materials processed with the smallest amount of effort and tools, which is still able to produce a functional and playable pedalboard. However, just like with the gold paint (and really, the decision to use any paint at all), I can't resist a few extra touches to try to make it look a little better. Rather than straight cuts, I cut the front edges of the vertical supports in a decorative "S" shape:
The vertical supports also hold up the nameplates.
Because of my paint-it-first approach, I later have to remove paint (through sanding) in strategic areas, to enable the wood glue to take hold. With enough foresight, these areas could have been masked with tape (as I did with the D-25 opening), but since I'm designing as I go, I can at best only hope to have enough foresight not to make big mistakes that ruin lots of material; smaller changes come with the territory.
Sheetrock-type woodscrews hold the pieces in place for the glue to take hold, and give extra strength like rebar does in concrete.
Now, time to make the foot-boards, the planks which will have rubber feet -- and which need to be the right length and in positions to support the unit properly, as pedals are pushed down. My initial experiments showed that the foot boards needed to be quite a bit longer than I originally planned, because of the strong torque when the long keylevers are pushed down against the spring force: the whole unit tends to want to flip forward on its front feet, the back feet coming off the floor. My design is so light (relatively) that there isn't a big clunky weight to hold things in place. Someday, there will probably be a tower of manual keyboards mounted on top, which would hold things in place pretty well I imagine, but anyway...
With the foot-boards installed, and with temporary scrap-wood instead of the nice nameplates to keep the keylevers corralled in place, I can finally stand the units up in the vertical position, as intended for transport. Placed back-to-back in the positions they'll be in when hinged, one can see that the four foot-boards interlace conveniently: the two belonging to the RHS are more narrowly spaced and fit in between the two wide ones of the LHS. This is just a matter of happy coincidence, of the positions of the sharps in the 32-note pedalboard (the places where there *aren't* sharps being the obvious locations for extra structure); and of the place where I chose to make the LHS/RHS split, which really couldn't be any other place (again because of the sharps), assuming splitting into two pieces.
Doing some touch-up painting on the frame. The ability of the keylevers to flip up and over, once the nameplate is removed, is convenient for service (especially since the keylevers are not individually removeable, as they would be in many keyboard and pedalboard designs).
Now, adding the felt to the nameplates and spring rails, which will define the upper and lower travel limits of the pedals. I'm starting out with a rather deep amount of travel, nearly the width of the vertical support lumber minus the width of the keylever lumber (and minus the felt). I figure, if I later want to reduce the travel when I can finally feel how it really plays, that'll be easier than trying to increase the travel: I'll have to tear out the felt on the nameplates and then add shims of wood to the nameplate undersides, and new felts. This will lower the top (quiescent) travel position, preserving the nice, close-to-the-floor bottom travel position. (At one time, I thought about making the travel (field-) adjustable, but nah.)
And now, time to fabricate 32 as-identical-as-possible springs, from my supply of straight 12-guage steel wire. (Simple things like finding that cheap supply of straight wire at Home Depot, have made all the difference in this project. None of the other spring ideas that I considered, would have had the strength to balance these long keylevers, I now see; and if the wire I'm fabricating the springs from were not initially straight (i.e., if it were pulled from a spool or coil), the effort to shape the springs would have been dramatically more tedious, with less consistent results.)
Shallow holes are bored into the bottoms of the keylevers, to receive the ends of the springs.
After passing the straight longer end of each spring through its hole in the spring rail, I bend the end over 90 degrees; this end then passes through a second hole at right-angles when the spring rail is joined to the guide rail.
Despite my best efforts to manufacture the springs consistently, it turns out that each one needs to be custom-bent after installation, in order to make the action and strength consistent and to make the coiled center of the spring stay in the right place throughout the travel. They end up looking kinda ugly and crooked, but at least the behaviour of each one is correct.
(The issue is the exact length of the two straight legs of the spring, vis a vis the position of the coil in the middle: I could have probably attained better consistency by making the legs slightly too long, and clipping to size after forming the coils; but to try to save material and effort, I attempted to form the coils in a consistent position on the final length of wire; however, given the "angular amplification" between the small distance separating the two ends of the spring when installed, and the long length of the legs from the ends to the coil (about 6 inches), a small error in the coil position (i.e., lengths of the legs) causes a large amount of "steer", upwards or downwards, in the motion of the coil end as the pedal moves. If the coil moves upwards, it hits the keylever, and if it moves downwards, it hits the floor, in either case causing noise and a bad feel to the action (and maybe messing up your floor!). Another way to address this would have been to use screws-and-washers to hold down the ends of the springs, after passing through the holes in the spring-rail: this would have allowed the spring end to be moved forward and back to adjust the motion of the coil. Of course, I had thought I was clever to eliminate the screws-and-washers...)
I'm just glad that there *is* a way to bend each spring such that it operates correctly and stays in place. I knew this might be tricky, given the inherent difference in the lengths of the two legs the way I have designed it. I was prepared to have to add more wood, in order to permit exactly-symmetrical springs (and I have enough steel wire on-hand to make a whole new set if it had come to that); but fortunately, it seems I can make the current arrangement work, with a certain amount of tedious effort.
Now, the basic physical structure is in-place, and the pedals are playable (with no sound). Next up, a lot of little fittings and details such as hinges, latches, and feet; and the other major element: the electrical wiring.
Oh yes, BTW, I should discuss the phrase "LUX SIT" a little. Happens to be the slogan on the coat of arms of one of my "alma maters", the University of Washington, though frankly I had forgotten that when I chose it for this project. It is alleged to be a bad Latin translation of the phrase "let there be light". A better translation of God's invocation of creation in the Book of Genesis, I'm told, would be "FIAT LUX", which means something like "let the light come into being" (where it previously had not existed). "LUX SIT", those who have any knowledge in this area say, means something more like "let the light continue to exist". However, this latter meaning seems closer to my intent anyway, so I keep it that way. I'm not trying to pre-empt God here! (It is traditional for many harpsichords and other ancient keyboard instruments to carry an inscription, usually in Latin. Actually, if I really wanted to repeat God's phrase from Genesis, I'd probably use Hebrew characters, which also have the important benefit of looking really cool.)


No comments:
Post a Comment